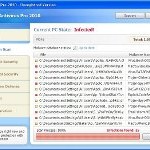
 XP Security Tool 2011 is an updated version of earlier appeared XP Security Tool 2010, which is a rogue antispyware program. Both programs are identical except for their names and partially modified executable files, which is necessary in order to remain undetected by legitimate antispyware and antivirus applications. As before, this malware uses trojans to install itself. When the trojan is started, it will install XP Security Tool 2011 onto your computer without your permission and knowledge.
Immediately after launch, XP Security Tool 2011 will register pw.exe (its core component) in the Windows registry so, it will run automatically every time when you start an application (files with “exe” extension). The rogue also uses this method of running to block the ability to run any programs, including security applications.
Once started, XP Security Tool 2011 will perform a system scan and report a lot of various infections that will not be fixed unless you first purchase the software. Important to know, all of these infections are a fake and do not actually exist on your computer.
While XP Security Tool 2011 is running, it will display various fake security alerts that state:
Stealth intrusion!
Infection detected in the background. Your computer is now
attacked by spyware and rogue software. Eliminate the
infection safety, perform a security scan and deletion now.
System hijack!
System security threat was detected. Viruses and/or spyware
may be damaging your system now. Prevent infection and
data loss or stealing by running a free security scan.
Moreover, the rogue will also hijack Internet Explorer and Firefox and display fake warning page instead a site that you want to visit. It will state:
XP Security Tool 2011 ALERT
Internet Explorer alert. Visiting this site may pose a security threat to your system
As you can see, XP Security Tool 2011 is a scam and should be removed from your computer upon detection. Do not be fooled into buying the program! Instead of doing so, follow the removal guidelines below in order to remove XP Security Tool 2011 and any associated malware from your computer for free.
Use the following instructions to remove XP Security Tool 2011 (Uninstall instructions)
Step 1. Repair “running of .exe files”.
Method 1
Click Start, Run. Type command and press Enter. Type notepad and press Enter.
Notepad opens. Copy all the text below into Notepad.
Windows Registry Editor Version 5.00
[-HKEY_CURRENT_USER\Software\Classes\.exe]

[-HKEY_CURRENT_USER\Software\Classes\pezfile]

[-HKEY_CLASSES_ROOT\.exe\shell\open\command]
[HKEY_CLASSES_ROOT\exefile\shell\open\command]

@="\"%1\" %*"
[HKEY_CLASSES_ROOT\.exe]

@="exefile"

"Content Type"="application/x-msdownload"
Save this as fix.reg to your Desktop (remember to select Save as file type: All files in Notepad.)
Double Click fix.reg and click YES for confirm.
Reboot your computer.
Method 2
Click Start, Run. Type command and press Enter. Type notepad and press Enter.
Notepad opens. Copy all the text below into Notepad.
[Version]

Signature="$Chicago$"

Provider=www.myantispyware.com
[DefaultInstall]

DelReg=regsec

AddReg=regsec1
[regsec]

HKCU, Software\Classes\.exe

HKCU, Software\Classes\pezfile

HKCR, .exe\shell\open\command
[regsec1]

HKCR, exefile\shell\open\command,,,"""%1"" %*"

HKCR, .exe,,,"exefile"

HKCR, .exe,"Content Type",,"application/x-msdownload"
Save this as fix.inf to your Desktop (remember to select Save as file type: All files in Notepad.)
Right click to fix.inf and select Install. Reboot your computer.
Step 2. Remove XP Security Tool 2011 associated malware.
Download MalwareBytes Anti-malware (MBAM). Once downloaded, close all programs and windows on your computer.
Double-click on the icon on your desktop named mbam-setup.exe. This will start the installation of MalwareBytes Anti-malware onto your computer. When the installation begins, keep following the prompts in order to continue with the installation process. Do not make any changes to default settings and when the program has finished installing, make sure a checkmark is placed next to “Update Malwarebytes’ Anti-Malware” and Launch “Malwarebytes’ Anti-Malware”. Then click Finish.
MalwareBytes Anti-malware will now automatically start and you will see a message stating that you should update the program before performing a scan. If an update is found, it will download and install the latest version.
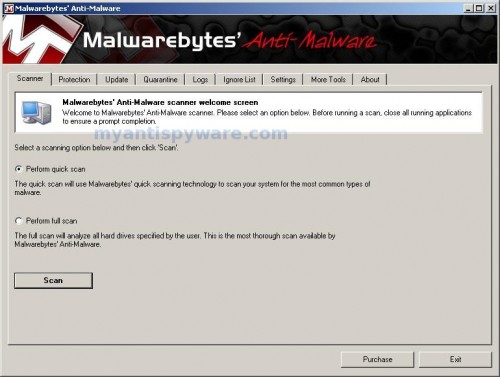
As MalwareBytes Anti-malware will automatically update itself after the install, you can press the OK button to close that box and you will now be at the main menu. You will see window similar to the one below.

Malwarebytes Anti-Malware Window
Make sure the “Perform quick scan” option is selected and then click on the Scan button to start scanning your computer for XP Security Tool 2011 infection. This procedure can take some time, so please be patient.
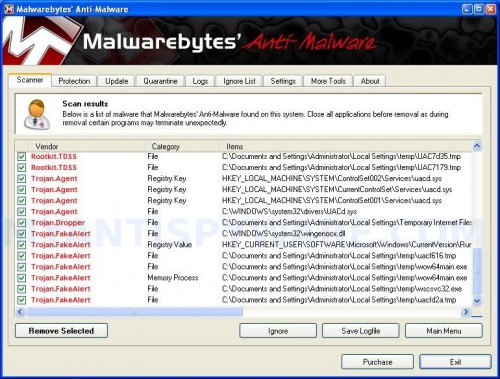
When the scan is finished a message box will appear that it has completed scanning successfully. Click OK. Now click “Show Results”. You will see a list of infected items similar as shown below.
Note: list of infected items may be different than what is shown in the image below.

Malwarebytes Anti-malware, list of infected items
Make sure all entries have a checkmark at their far left and click “Remove Selected” button to remove XP Security Tool 2011. MalwareBytes Anti-malware will now remove all of associated XP Security Tool 2011 files and registry keys and add them to the programs’ quarantine. When MalwareBytes Anti-malware has finished removing the infection, a log will open in Notepad and you may be prompted to Restart.
Note: if you need help with the instructions, then post your questions in our Spyware Removal forum.
XP Security Tool 2011 creates the following files and folders
%AppData%\pw.exe
XP Security Tool 2011 creates the following registry keys and values
HKEY_CURRENT_USER\Software\Classes\.exe
HKEY_CURRENT_USER\Software\Classes\.exe\DefaultIcon
HKEY_CURRENT_USER\Software\Classes\.exe\shell
HKEY_CURRENT_USER\Software\Classes\.exe\shell\open
HKEY_CURRENT_USER\Software\Classes\.exe\shell\open\command
HKEY_CURRENT_USER\Software\Classes\.exe\shell\runas
HKEY_CURRENT_USER\Software\Classes\.exe\shell\runas\command
HKEY_CURRENT_USER\Software\Classes\.exe\shell\start
HKEY_CURRENT_USER\Software\Classes\.exe\shell\start\command
HKEY_CURRENT_USER\Software\Classes\pezfile
HKEY_CURRENT_USER\Software\Classes\pezfile\DefaultIcon
HKEY_CURRENT_USER\Software\Classes\pezfile\shell
HKEY_CURRENT_USER\Software\Classes\pezfile\shell\open
HKEY_CURRENT_USER\Software\Classes\pezfile\shell\open\command
HKEY_CURRENT_USER\Software\Classes\pezfile\shell\runas
HKEY_CURRENT_USER\Software\Classes\pezfile\shell\runas\command
HKEY_CURRENT_USER\Software\Classes\pezfile\shell\start
HKEY_CURRENT_USER\Software\Classes\pezfile\shell\start\command
HKEY_CURRENT_USER\Software\Classes\.exe\shell\open\command | @ = “”%AppData%\pw.exe” /START “%1″ %*”
HKEY_CURRENT_USER\Software\Classes\.exe\shell\open\command | IsolatedCommand = “”%1″ %*”
HKEY_CURRENT_USER\Software\Classes\.exe | @ = “pezfile”
HKEY_CURRENT_USER\Software\Classes\.exe | Content Type = “application/x-msdownload”
HKEY_CURRENT_USER\Software\Classes\pezfile\shell\open\command | @ = “”%AppData%\pw.exe” /START “%1″ %*”
HKEY_CURRENT_USER\Software\Classes\pezfile\shell\open\command | IsolatedCommand = “”%1″ %*”


AWESOME!! i was about to give up and just get a new PC. this was simple and perfect. i’m glad there are some good guys out there to fight the bad ones. thanks so much!